There are two ways to ensure your content is accessible: conform to the Web Content Accessibility Guidelines (WCAG) and involve people with disabilities in evaluating and testing your content.
Conforming to WCAG 2.0
The Web Content Accessibility Guidelines (WCAG 2.0) are standards developed by the W3C to assist in the development of accessible digital content. There are a few ways to ensure conformance to WCAG including documentation, checklists, and testing tools.
WCAG 2.0 Documentation
The W3C provides documentation on how to conform to WCAG 2.0 but it is quite extensive and can be overwhelming for beginners.
WCAG 2.0 Checklist
WebAim provides a WCAG 2.0 checklist based on their interpretation of WCAG’s guidelines and success criteria that is easy to follow and a good place to start to learn about what is required to conform to the standard.
Machine Testing using Evaluation Tools
There are many tools that can provide automated accessibility evaluations or audits. These tools can verify conformance to WCAG 2.0 and the level of conformance (A-AAA). These tools are required to assist content developers and designers in identifying errors and providing suggestions for fixes, but they cannot tell you if your web content is actually accessible.
LEARN Accessibility Checker
LEARN has an accessibility checker built in to the HTML Editor that will identify some of the WCAG 2.0 guidelines.
How to use LEARN’s Accessibility Checker
WAVE: Web Accessibility Evaluation Tool
WebAIM’s WAVE is the easiest to use evaluation tool. WAVE is made available as a Chrome extension, a Firefox add-on or online. The online version can be used to evaluate web pages and the browser plugins can be used to evaluate web pages and LEARN content.
Chrome Extensions
- Accessibility Developer Tools
- WCAG Accessibility Audit Developer UI
- Axe Accessibility
- Siteimprove Accessibility Checker
FireFox Add-ons
Web Accessibility Evaluation Tools List
The W3C provides an extensive list of accessibility evaluation tools.
Human Testing
While WCAG conformance can go along way to assisting with making accessible content and evaluation tools can identify errors only humans can really determine whether web content is accessible. To ensure your content is accessible it is recommended that you enlist people with disabilities to test your content. People with disabilities bring their experiences and assistive technologies they use to navigate web content.
Recommended reading
Why accessibility testing with real users is so important
Tips For Conducting Usability Studies With Participants With Disabilities
]]>As an instructor, having students set up notifications will ensure they receive News updates, or other notifications as soon as possible. This is especially useful for communicating cancellations or changes due to weather or other circumstances.
-
- From within LEARN, click your username and then notifications

- You are then able to enable email and/or mobile notifications, and then define exactly what you will receive notifications on and from which courses.
- Once done, click “Save”
Video:
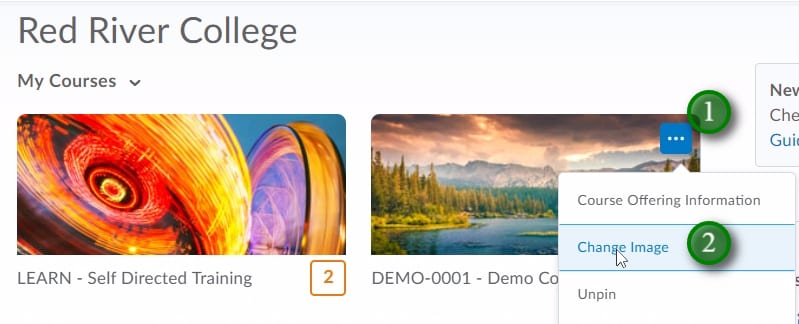
]]>An image will be automatically assigned to each course in LEARN as it’s created, you are able to personalize any course that you are the instructor or developer in by changing that image and even uploading your own custom image.
- Find the course who’s image you would like to change. Hover over the course’s existing image and click the “…” icon (1), then click “Change Image” (2)
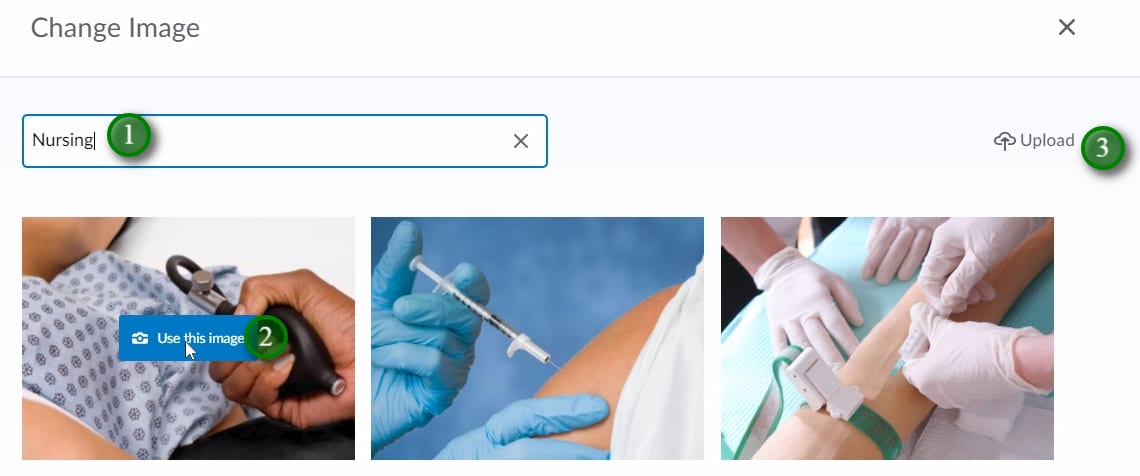
- Type the topic you wish to search for an image in (1) and click “Enter”. Select the image you wish to use by hover over it and click “Use this Image” (2).
- If you wish to upload an image that you have taken, or is free of copyright restrictions click “Upload” (3).
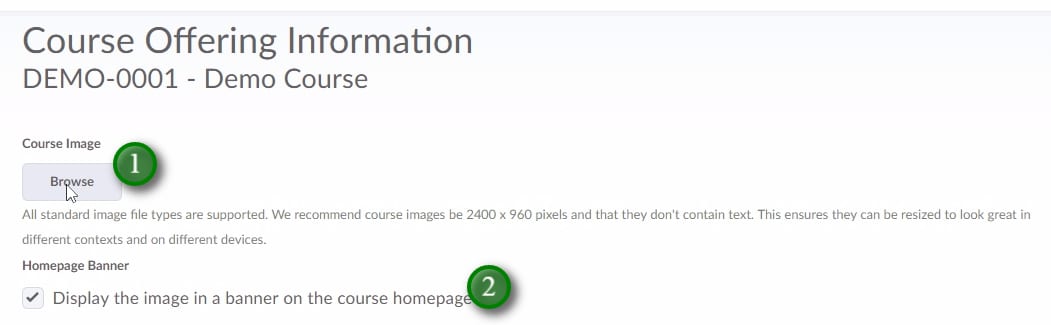
- Clicking to upload an image will bring you to the Course Offering Information portion of your course. You can also access this page by entering the course, clicking “Edit Course”, and “Course Offering Information”.
- To upload your own copyright free image click “Browse” (1) and follow the prompts. You can even add this image as a banner across the course home page by clicking “Display the image in a banner…” (2)
Video:
Video Description:
With the addition of the course tiles in the “My Courses” widget, you are able to change the image that is displayed.
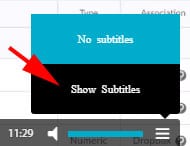
To access the captioning for this video:
- Move your mouse to the lower right side of the video window.
- Click the menu item represented by three dashes
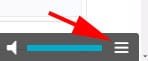
- If captions are available, click “Show Subtitles”
Description:
How to Build a Dropbox
]]>LEARN’s gradebook is a flexible tool that gives instructors a great deal of control over how information is released to students.
Hiding a Grade Item or Category from Student View
There are many reasons you may wish to hide a grade item or category from student view. You may wish to release grade items on a specific date, or only show a cumulative grade through the category.
Note: Hiding grade items within a category may still display a grade on the category depending on the category settings.
Hiding/Releasing a Grade Item
- Enter Course
- Click “Assessments”, and “Grades”

- From “Manage Grades” click the “action” button (
 ) beside the grade item you wish to hide/release, then click “Edit Grade Item”

- Click “Restrictions”

- Adjust the “Visibility” settings
- “Grade item is always visible” will allow a student to see this grade item unless a release condition is restricting it’s view or there are higher level restrictions on its category
- “Hide this grade item” will hide the grade item from student view until this setting is removed
- “Grade item is visible for a specific date range” will allow for a timed release of the grade item unless a release condition is restricting its view or there are higher level restrictions on its category
- Release Conditions can be applied to any grade item. A release condition in its simplest form is a setting that will restrict the release of an item until a defined condition has been met
Hiding/Releasing a Grade Category
To hide/release a grade category follow the same steps outlined for a grade item, except select the “Edit Grade Item” from the category’s “action” button (![]() ). When you apply a restriction to a category it will apply the chosen settings to the items within that category. Individual settings can still be applied to the item within allowing for staggered releases etc. Note that even if an individual item in a category is hidden from student view a category by default will show a cumulative grade unless you change those settings.
). When you apply a restriction to a category it will apply the chosen settings to the items within that category. Individual settings can still be applied to the item within allowing for staggered releases etc. Note that even if an individual item in a category is hidden from student view a category by default will show a cumulative grade unless you change those settings.
Changing the Display Settings on a Grade Item or Category
When you first run the “Gradebook Setup Wizard” you made some decisions on what grade details you would like the students to see. You can run the wizard at any point to make changes, make changes in settings or override those settings on individual grade items and categories.
Gradebook Setup Wizard
- Enter Course
- Click “Assessments”, and “Grades”
- Click “Gradebook Setup Wizard”

- Click “Start”
- Follow the prompts
Settings
- Enter Course
- Click “Assessments”, and “Grades”
- Click “Settings” near the upper right hand corner of the page

- Click “Personal Display Options” to adjust settings for your view

- Click “Org Unit Display Options” to adjust settings for student view
Override Settings in Grade Items/Categories
- Enter Course
- Click “Assessments”, and “Grades”
- From “Manage Grades” click the “action” button () beside the grade item or category you wish to modify the student view in and click “Edit Grade Item”
- Under “Properties” scroll to the bottom of the page, click “Show Display Options” if it is hidden

- Apply any optional “Student View” settings you may want

- Click “Override display options for this item” and remove or add options
- By removing all options under “Override display options for this item” the student will not see any grade for that item. This may be an appropriate setting for a grade category if you are staggering the release of the individual grade items
Click “Save” or “Save and Close”
Releasing the Final Grade
By default the final grade is not visible to students. It is up to the instructor if/when they wish to release that final grade to the students.
When using the “Gradebook Setup Wizard” to apply the initial settings in the gradebook, you will have decided if you wanted to release the final calculated or adjusted grade to the students. This setting will only affect what the student is able to see. For your reference and purposes both the calculated and adjusted final grades are available. You will notice throughout the wizard, and when you view the gradebook settings that there are distinct settings for student or instructor view.
Releasing the Calculated or Adjusted Final Grade
You can opt to release the final calculated grade at any time during a course. Releasing the final calculated grade early will show the students a running total of how they are doing in the course. Note that your program may have policies about not releasing the final grades to students outside of Webadvisor.
To release the calculated or final grade:
- Enter your course
- Click “Assessments”, and “Grades”
- From Enter Grades or Manage Grades click the “action” () button beside “Final Calculated Grade”, then click “Enter Grades”

- Note whether you are releasing the final adjusted or calculated grade based on the settings applied in the “Gradebook Setup Wizard” or settings

- If you are releasing the final adjusted grade, you will first have to transfer all grades to the “Final Adjusted Grade” column
- Click the “action” button () beside “Final Grades” (near the top of the page), click “Transfer All” or “Recalculate All”, make any adjustments needed and then “Save”

- Click the “action” button (
- Click the “action” button () beside “Final Grades” (near the top of the page), click “Release All”
- Manually release or un-release grades to specific students by checking or un-checking the box under the “Release Final Grade” column
- Click “Save”
- If you are releasing the final adjusted grade, you will first have to transfer all grades to the “Final Adjusted Grade” column
Templates are a great way to not only make your course content look good but also to give it a consistent look and feel between pages and topics. When course content has a consistent and professional look, it is easy to read and follow for students and helps them focus on the important information in your course without potentially clumsy and distracting formatting.
 In the example above, you can see that the template removes the distracting formatting and produces a clean and easy to read document by simply copying and pasting the content into LEARN.
Templates also save you time because you don’t have to do any formatting in Word or any other program before bringing your content into LEARN. Simply copy and paste your unformatted content into LEARN and the template will do all the formatting for you.
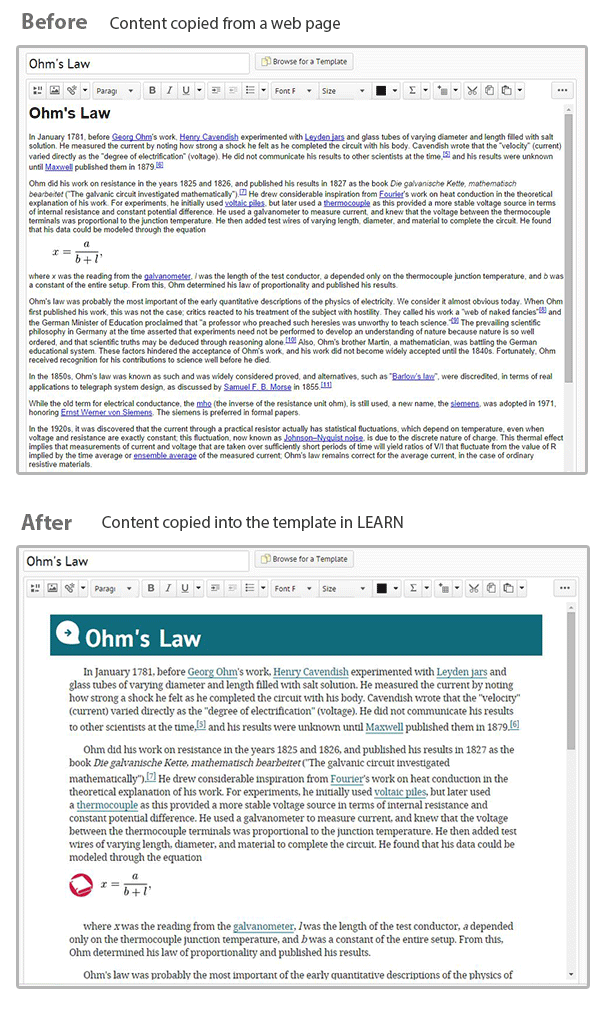
No matter what content you put into it the template will keep a consistent look for your entire course. Alternatively, you can type all of your content right into the LEARN template in your course or course master and your content will be formatted as you type.
There are currently 3 colours to choose from so choose one you like or use different colours to differentiate between certain topics or units in your course.

To get started using templates follow these steps:
Step 1: Create a file or edit HTML of an existing file in your LEARN course.
Step 2: Click the Select a Document Template button beside your document tile.

| Note: If your file already has content in it, make a copy of the content in Microsoft Word, Wordpad or similar program before selecting a template. All content in the page will be overwritten by selecting a template. If you are creating a new file this is not an issue. It is recommended that you select a template before creating any content in a new file. |
Step 3: Paste your content into the file or simply start typing new content.

Have fun using templates in LEARN!
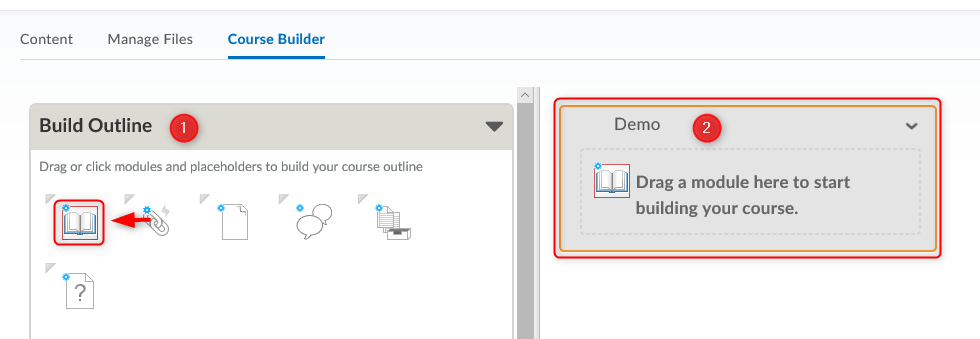
]]>The Course Builder Tool allows you to map and plan out your course before adding content. You can apply place holders for content, quizzes, dropbox, etc. and easily apply the content when ready. Creating the association from an assessment item to the gradebook is made easy through the drag and drop interface.
How to access Course Builder? (Written guidelines)
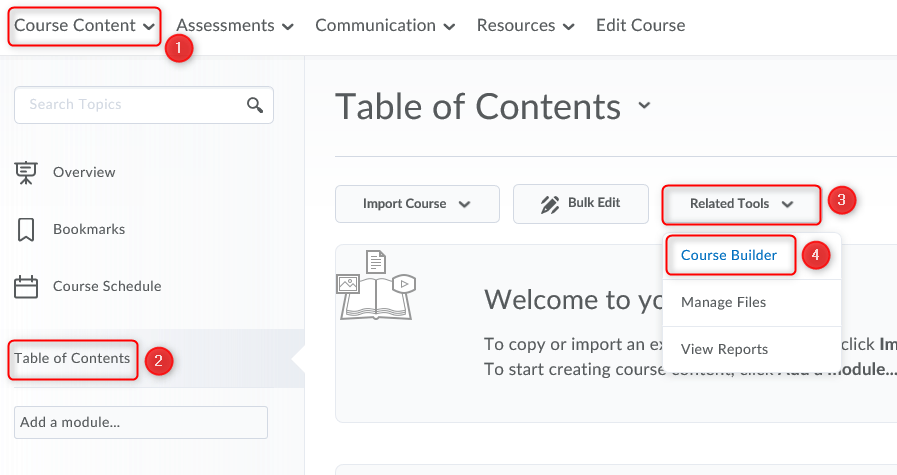
- To access Course Builder, enter your course, click “Course Content”, “Content” (1), “Table of Contents” (2), “Related Tools”(3), and “Course Builder” (4)
You can also access Course Builder by clicking “Edit Course” (1), and “Course Builder” (2)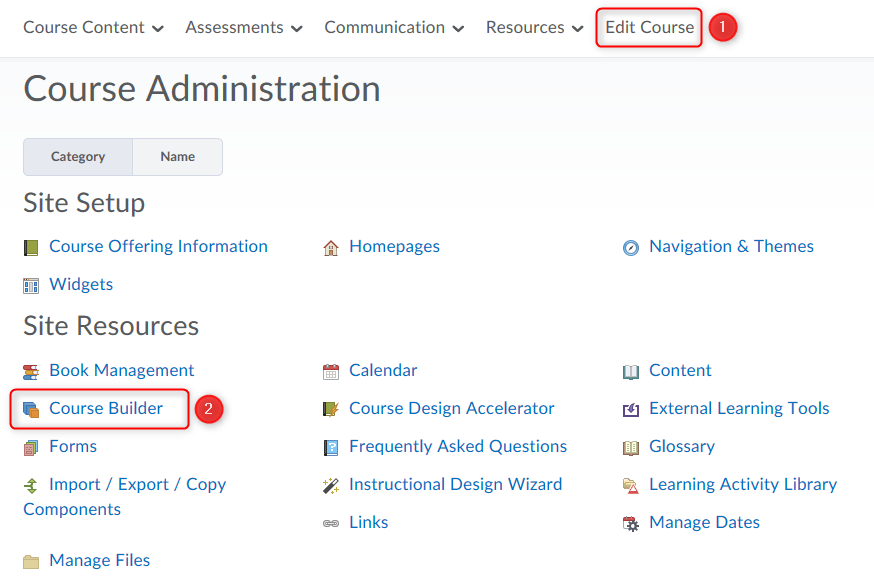
- You are able to build placeholders in your course by dragging them from the “Build Outline” area (1) to the course structure area (2)
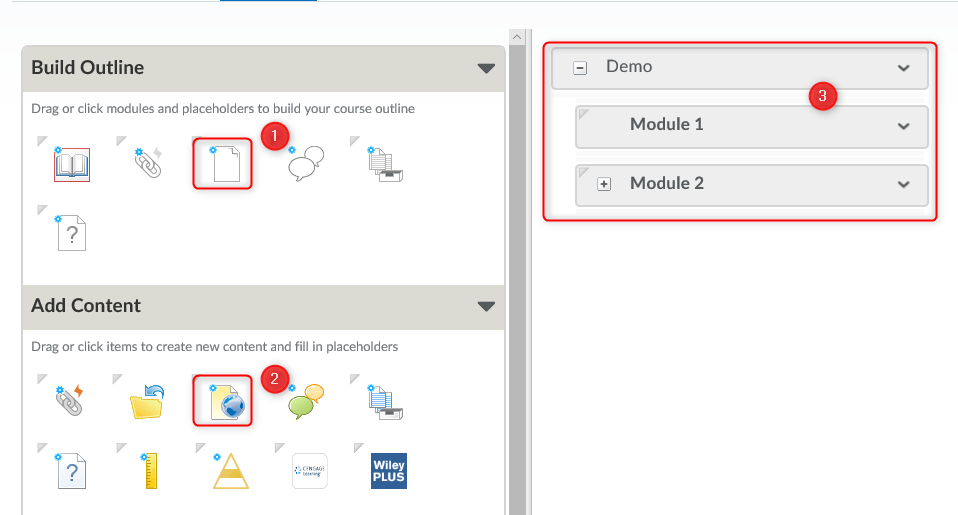
- You are able to lay out your modules and placeholders (1), as well as add content that is ready to be added (2). Both simply have to be dragged to the course structure area (3)
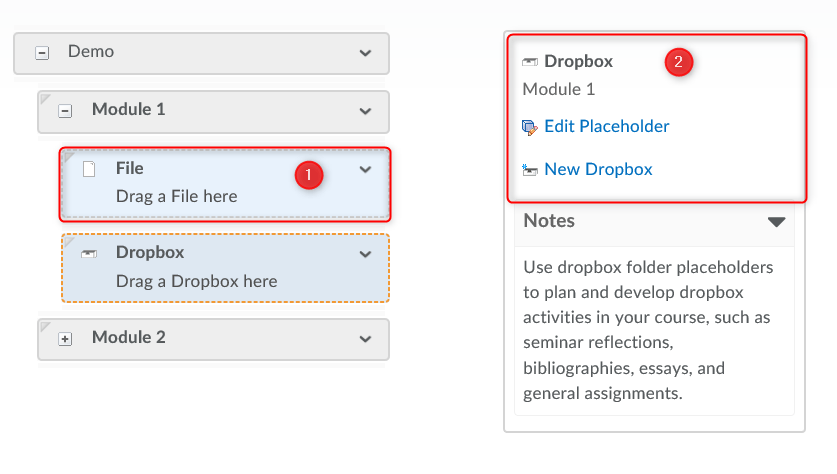
- When it comes time to add content to placeholders, simply click on the placeholder in the course structure area (1), and then access the options that appear in the panel to the right (2)
Description: Learn how to use the HTML wysiwyg (what you see is what you get) Editor ]]>
Description:Learn how to upload the content outline ]]>
Description: Learn how to upload content
]]>